Google has an alternative which is easier than gcm. So today in this Firebase Cloud
Messaging Tutorial I will teach you how to send push notification to
single android devices using Firebase Cloud Messaging.
Points to integrate fcm in your project.
Points to integrate fcm in your project.
- Crate a project in android studio.
- Open build.gradle(project) and add a class path to it(
classpath 'com.google.gms:google-services:3.0.0'). After adding the class path it will be look like this-
// Top-level build file where you can add configuration options common to all sub-projects/modules.
buildscript {
    repositories {
        jcenter()
    }

    dependencies {
        classpath 'com.android.tools.build:gradle:2.2.0'

        //________class path for google service
        classpath 'com.google.gms:google-services:3.0.0'
        // NOTE: Do not place your application dependencies here; they belong
        // in the individual module build.gradle files
    }
}

allprojects {
    repositories {
        jcenter()
    }
}

task clean(type: Delete) {
    delete rootProject.buildDir
}
- Open build.gradle(app).
- Add a dependancy (
<project>/<app-module>/build.gradle)- - compile 'com.google.firebase:firebase-messaging:9.0.0'
- Add a plugin in the bottom of build.gradle(
<project>/<app-module>/build.gradle)- - apply plugin: 'com.google.gms.google-services' .
- After adding dependency and plugin your app level build.gradle will be look like this-
apply plugin: 'com.android.application' android { compileSdkVersion 23 buildToolsVersion "23.0.2" defaultConfig { applicationId "com.firebasedemoproject" minSdkVersion 15 targetSdkVersion 23 versionCode 1 versionName "1.0" testInstrumentationRunner "android.support.test.runner.AndroidJUnitRunner" } buildTypes { release { minifyEnabled false proguardFiles getDefaultProguardFile('proguard-android.txt'), 'proguard-rules.pro' } } } dependencies { compile fileTree(dir: 'libs', include: ['*.jar']) androidTestCompile('com.android.support.test.espresso:espresso-core:2.2.2', { exclude group: 'com.android.support', module: 'support-annotations' }) compile 'com.android.support:appcompat-v7:23.2.1' testCompile 'junit:junit:4.12' /*______________________messaging______________________*/ compile 'com.google.firebase:firebase-messaging:9.0.0' } apply plugin: 'com.google.gms.google-services' - Open manifest.xml and update it--
- Add INTERNET permission
- Add service to receive notification.
- Add service to receive firebase instance ID(Device Token).
- Now your updated manifest.xml will be look like this-
<?xml version="1.0" encoding="utf-8"?>
<manifest xmlns:android="http://schemas.android.com/apk/res/android"
    package="com.firebasedemoproject">

 <!--add permission-->
<uses-permission android:name="android.permission.INTERNET" />

 <application
        android:name=".MyApplication"
        android:allowBackup="true"
        android:icon="@mipmap/ic_launcher"
        android:label="@string/app_name"
        android:supportsRtl="true"
        android:theme="@style/AppTheme">

        <!--activities-->
        <activity android:name=".MainActivity">
            <intent-filter>
                <action android:name="android.intent.action.MAIN" />
                <category android:name="android.intent.category.LAUNCHER" />
            </intent-filter>
        </activity>

        <!--service-->

   <!--service to recive notifications-->
        <service android:name=".fcm_service.MyFirebaseMessagingService">
            <intent-filter>
                <action android:name="com.google.firebase.MESSAGING_EVENT" />
            </intent-filter>
        </service>

     <!--service to create firebase instance ID(Device Token)-->
        <service android:name=".fcm_service.MyFirebaseInstanceIDService">
            <intent-filter>
                <action android:name="com.google.firebase.INSTANCE_ID_EVENT" />
            </intent-filter>
        </service>
    </application>
</manifest>
- Now go to the Firebase developer console and create a new project

- Enter your application name and select your country. then click on create project
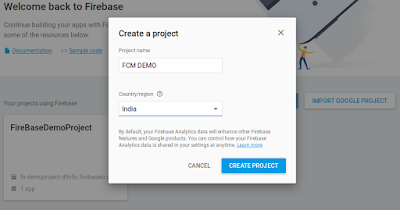
- Now you will see a screen like this
then click on "add Firebase to your Android app".- Now put
- Package name
- App nickname (optional)
- Debug signing certificate SHA-1 (optional)

- Copy and paste the google-services.json file into the application root directory.

- Now create a class named MyFirebaseInstanceIDService.java and write the following code.
package com.firebasedemoproject.fcm_service; import android.util.Log; import com.google.firebase.iid.FirebaseInstanceId; import com.google.firebase.iid.FirebaseInstanceIdService; /** * Created by android_studio on 17/11/16. */ public class MyFirebaseInstanceIDService extends FirebaseInstanceIdService { private static final String TAG = "MyFirebaseIIDService"; @Override public void onTokenRefresh() { //Getting registration token String refreshedToken = FirebaseInstanceId.getInstance().getToken(); //Displaying token on logcat Log.e(TAG, "Refreshed token: " + refreshedToken); } private void sendRegistrationToServer(String token) { //You can implement this method to store the token on your server //Not required for current project } } - Now create MyFirebaseMessagingService.java and write the following code.
package com.firebasedemoproject.fcm_service; import android.app.NotificationManager; import android.app.PendingIntent; import android.content.Context; import android.content.Intent; import android.media.RingtoneManager; import android.net.Uri; import android.support.v4.app.NotificationCompat; import android.util.Log; import com.firebasedemoproject.MainActivity; import com.firebasedemoproject.R; import com.google.firebase.messaging.FirebaseMessagingService; import com.google.firebase.messaging.RemoteMessage; /** * Created by android_studio on 17/11/16. */ public class MyFirebaseMessagingService extends FirebaseMessagingService { private static final String TAG = "MyFirebaseMsgService"; @Override public void onMessageReceived(RemoteMessage remoteMessage) { //Displaying data in log Log.d(TAG, "From: " + remoteMessage.getFrom()); Log.d(TAG, "Notification Message Body: " + remoteMessage.getNotification().getBody()); //Calling method to generate notification sendNotification(remoteMessage.getNotification().getBody()); } //This method is only for generating local notification with push notification data(titlenmessage) private void sendNotification(String messageBody) { Intent intent = new Intent(this, MainActivity.class); intent.addFlags(Intent.FLAG_ACTIVITY_CLEAR_TOP); PendingIntent pendingIntent = PendingIntent.getActivity(this, 0, intent, PendingIntent.FLAG_ONE_SHOT); Uri defaultSoundUri = RingtoneManager.getDefaultUri(RingtoneManager.TYPE_NOTIFICATION); NotificationCompat.Builder notificationBuilder = new NotificationCompat.Builder(this) .setSmallIcon(R.mipmap.ic_launcher) .setContentTitle("Firebase Push Notification") .setContentText(messageBody) .setAutoCancel(true) .setSound(defaultSoundUri) .setContentIntent(pendingIntent); NotificationManager notificationManager = (NotificationManager) getSystemService(Context.NOTIFICATION_SERVICE); notificationManager.notify(0, notificationBuilder.build()); } } - All the setup has completed and now run the application.
- Now see the logcat, You will see a token copy this.

- Go to the firebase console, You will see the window like this-

- Select Notification, You will see the window like this-

- Click on "Send your first message".
- Fill all the entire detail like -Message text, Target, FCM registration token

- Click on "send message".
- This is the notification which is sent from firebase.
-

- You can also check on fire base-

- Good bye, Thanks to read this blog.


nice, keep it up
ReplyDeleteji sir
Delete